When I first started baking sourdough bread, I kept ending up with a dense, gummy crumb and a thick, hard crust. I’d pull a loaf from the oven, feel it in my hands, and immediately know something was wrong, but I couldn’t quite tell why. Even after years of baking, these little mysteries pop up, and new bakers often run into the same issue. Signs like tunneling, uneven texture, or a loaf that doesn’t rise properly are key clues that your dough might be underproofed. Real examples and some tips really help, whether you’re following advice from a course or just learning on your own.
I learned that troubleshooting is part of the journey. Watching your loaves, noticing the finished crumb, and understanding the factors that contribute to underproofing makes all the difference. Even pros can have a loaf end up too dense. Investing in knowledge, paying attention to texture, and learning to solve these little baking puzzles can prevent the same outcome from happening again.
Sometimes, thinking about other bakes like Spotted Dick, The Classic British Steamed Pudding makes me realize that watching texture, crumb, and the overall feel is universal in baking. It helps you tell if your bread is underproofed, and with practice, you’re able to get it just right—every time.
What Does OverProofed Sourdough Bread; CLICK HERE
What, Exactly, is Proofing in Sourdough Baking?
When I first started baking sourdough, I realized that proofing isn’t just a step—it’s the heartbeat of the dough. During mixing and the first or second rise, wild yeast and lactic acid bacteria produce carbon dioxide, which helps the bread develop its flavor and creates a light, airy crumb. Watching the texture carefully is essential, because a loaf that’s underproofed can be tight, gummy, and heavy, while one left too long can collapse in the oven or become over-proofed. Even though an over-proofed loaf is still edible, it doesn’t taste as good, nor does it spring beautifully when baked.
Learning to nail temperature and time is key to properly proofed bread. I’ve found that checking the crumb during the final fermentation gives a better sense of when the dough is ready for the oven. Bulk fermentation is equally important, as skipping it or rushing can lead to dense loaves that lack that signature lightness and joy to eat. Every baker, whether new or experienced, encounters this issue, and learning from real examples of underproofed sourdough makes the process much easier.
Japanese Hokkaido Milk Bread ; CLICK HERE
Underproofed Sourdough: A Common Baking Mistake
I get emails from folks who follow simplicityandastarter.com, and one thing is clear: underproofed dough is a common mistake for new bakers. Whether you’ve baked bread at home or run into problems in a sourdough class, many struggles face the same issue. I’ve figured over time that simply knowing how to talk about overproofing and underproofed loaves can help you avoid the frustration of dealing with dense, tight bread, making the process much more enjoyable.
7 Signs of Underproofed Sourdough
So, what’s the best way to tell if your dough is underproofed? Here are 7 signs to watch for:
Sign #1: Stiff Dough
One clear sign your sourdough is underproofed is a stiff dough that doesn’t jiggle when you shake the bowl just before shaping. A properly proofed dough should be light, airy, and hold some spring, showing that the starter has fermented well and releases CO2. When the gluten is fully developed through stretch, folds, or coil techniques with a mature starter, the dough can hold the gas, turning it into a loaf that’s looking and feeling just right.
If the dough looks flat, dense, or too stiff, it most likely hasn’t bulk fermented long enough, which will lead to a dense bread. Paying attention in these early stages helps you avoid a loaf that won’t jiggle or rise properly, making the process smoother and giving your sourdough the light, airy texture every baker hopes for.
Sign #2: Cracked Top or Sides and Pyramid Top
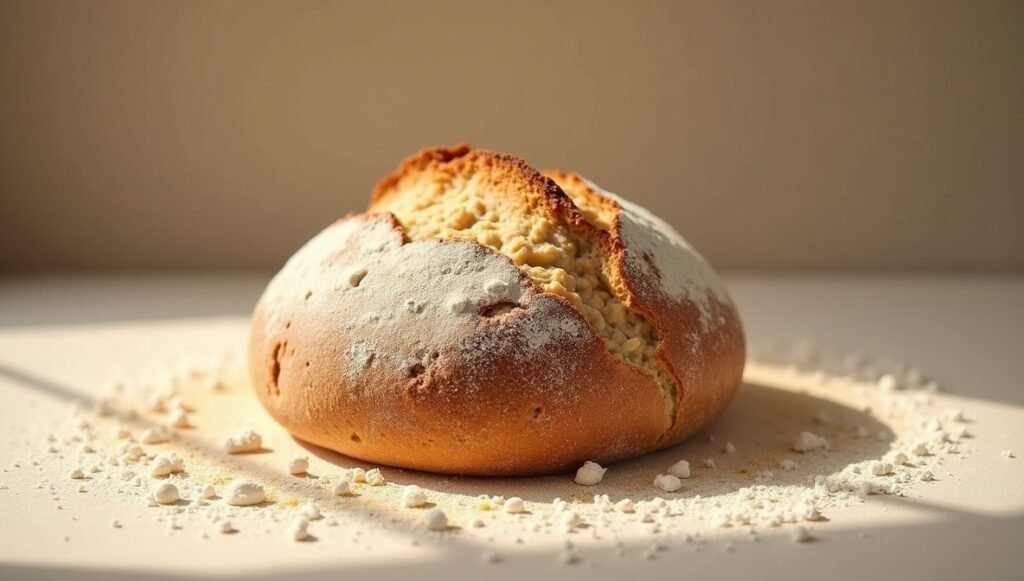
When baking sourdough, one sign of underproofed loaf is large cracks on the top or sides, sometimes with a raised, pyramid-like shape. You can notice this telltale clue as the dough expands rapidly in the oven, and trapped gas can form huge cracks beyond your scoring. A strong ovenspring or rise during the bake usually means it didn’t get enough time to develop the right crumb structure. Giving the dough a bit more time next can avoid the issue, making your bread look and feel just right.
Sign #3: Very Tight Crumb or Gummy Texture, Often Both
If your sourdough ends up dense or gummy, that’s a common sign it was underproofed. When the dough doesn’t get enough rise time, it can’t develop the gas and structure needed for a light, airy crumb. Instead, you’re left with a heavy, chewy loaf that’s hard to tear apart, and the crumb might feel sticky or very tight, resembling a sponge with tiny holes, some larger holes, or tunnels, especially near the top. This combination of tight and gummy texture is often seen together, giving a clear indication that the dough needed more proofing.
Sign #4: The Crumb Features Small or Irregular Holes, Sometimes With ”Tunnels”
One clear sign that your sourdough is underproofed is when the crumb has small, uneven holes or alveoli, sometimes forming little tunnels near the top crust. When the dough gets the right proofing, it should develop big air pockets that make the loaf light and airy, but if it hasn’t risen enough, the crumb turns dense, oddly shaped, and almost like a sponge. This happens because the dough didn’t expand properly during the rise, leaving the gas distribution uneven. Next time, try to give your dough a little extra time to proof, and you’ll see the crumb open up nicely without unwanted tunnels.
Sign #5: Hard Crust
One sign that your sourdough is underproofed is a hard, tough crust. When the dough doesn’t rise right during fermentation, it can mess with how the outer layer bakes, leaving you with a thick, hard loaf instead of the light, crispy crust you want. This usually happens because the dough didn’t have enough time to form air bubbles, which help the bread bake evenly and develop a delicate crust. Giving your loaf the proper proofing time can make all the difference, turning it into a bread that looks, smells, and feels just right.
Sign #6: Flavor Doesn’t Develop Fully
If your sourdough tastes flat or just lacks that rich, tangy flavor, it’s usually a sign that it was underproofed. When the dough doesn’t rise long enough, the wild yeast and bacteria don’t get time to develop the flavor fully, leaving a bread that feels a bit weak in depth and complexity. Letting the dough proof properly is really the secret to that perfect tang we all love, and it’s what makes a sourdough loaf taste just right every time.
Sign #7: The Dough Flunks the Poke Test
A simple poke test is a great way to see if your sourdough is properly proofed, especially during a second rise at room-temperature. If you do a cold-proof, this test might not work the same. When the dough flunks this test, it’s a sign it’s underproofed. Gently poke the dough and it should spring back slowly, leaving a small indent. If it springs back too quickly or doesn’t leave an indent at all, that means the dough hasn’t developed enough gas or elasticity during fermentation, and the lack of rise can lead to a dense, heavy loaf. Paying attention to this poke test helps you know if the dough is ready for the oven or needs a bit more time to proof.
Are Probiotics Really in Sourdough Bread? CLICK HERE
Tell-Tale Signs of Underproofed Sourdough Bread
Let’s dive in now and go over the common signs that you underproofed your sourdough.
1. Bread Has a Tight Crumb or Irregular Crumb With Tunneling
A very under-fermented loaf can leave your sourdough with a tight, dense crumb and tunneling, especially near the top crust. Instead of being alive and risen, the dough may feel rather stiff after shaping, right after its initial mixing, and the trapped gasses haven’t expanded enough during baking. In moderately underproofed loaves, tunnels will often show in the crumb, with small alveoli remaining tiny and tight around them. Even for a newbie, these irregular structures are a clear giveaway that the bread didn’t proof enough or develop properly, and bakers should aim for a more open, even, and desirably airy crumb.
2. Sourdough Bread Texture is Dense and Gummy
When your sourdough bread has a dense or gummy texture, it usually suffers from under-proofing or improper fermentation. Even when fully baked, the crumb can feel slightly doughy or bland, and lines may be running through the loaf, especially in a sandwich loaf. A closed or tight crumb in croissants, hamburger buns, or pastries like Danishes can leave a dense, doughy interior instead of a light, flaky, open honeycomb.
To avoid this, you need to allow the dough to proof properly, reach the right internal temperature—around 200°-210°F (93°-99°C) for lean dough or 190°-200°F (88°-93°C) for enriched dough—and measure it with an instant read thermometer. Let the bread cool completely, sometimes up to six hours for a large loaf, so that released steam doesn’t leave the crumb gummy. Even when bases are covered and everything is proper, texture issues may persist, which is often a blame on under-proofing.
This dense or gummy structure is not just limited to loaves; it can also be observed in other bakes that aren’t traditional loaves, like croissants, hamburger buns, or pastries. Pronounced layering, thick crumb, or a lack of open, fluffy, light texture indicates that the fermentation and proofing process didn’t allow the dough to develop fully, leaving bread less enjoyable to eat and less visually appealing.
3. Underproofed Sourdough Bread Has a Domed Shape
A common sign of moderately or slightly underproofed sourdough is a domed shape after it bakes, instead of relaxing into a nice, round belly. You’ll notice this in bread, dinner rolls, cinnamon buns, or bagels, where the final proof may have been cut short. Bagels may puff high during baking, causing holes to almost close shut, while hamburger buns bake tall and narrow, rather than forming a typical hamburger-bun shape. Cinnamon roll centers can pop out during baking even with proper shaping, and donuts may bulge while frying. Paying attention to this domed shape helps you identify underproofed loaves before slicing or serving.
4. Underproofed Sourdough Tearing While Baking
If your sourdough starts tearing or rupturing in the oven, it’s often a sign that the dough wasn’t fully proofed. The gluten structure hasn’t relaxed enough, and there’s still too much oomph from the starter, causing the bread to burst in areas where you didn’t score it. Sometimes, the bread may open too dramatically along the scoreline, creating an exaggerated, thick ear that sticks up tall above the loaf. If you’re baking a sandwich loaf, you may notice the crust splitting open on one side, just above the edge of the pan, as the dough expands too quickly without enough time to expand gracefully.
5. Underproofed Sourdough Crust is Too Hard and Thick
If the outer crust of your sourdough bread is nearly impossible to slice or too hard to chew, it’s a clear sign that the dough was likely underproofed. This can happen even if you’re working with a freeform loaf, as the lack of proper fermentation means the crust becomes tough. Although hydration levels affect the crust thickness, with higher hydration resulting in a thinner crust, proper fermentation should still allow for a pleasant texture, even with a low-hydration recipe. The crust should always be easy to enjoy, not a struggle to break through.
6. Crust is Pale and Won’t Brown
If your sourdough loaf has a pale, lackluster crust that won’t brown during baking, it’s a clear sign that the dough may be underproofed. The starter needs to break down the flour in the dough through fermentation to produce the sugars and amino acids that help caramelization and the Maillard reaction. These chemical reactions are responsible for the aromatic and flavorful browning of the crust. When the dough hasn’t fully fermented, these reactions can’t take place, leaving the crust unable to brown properly, no matter how long you bake it.
Conclusion
A weak starter and other factors can contribute to underproofed sourdough. Fortunately, the common signs of underproofing are easy to spot in the features of the baked bread. By recognizing these, you can make adjustments to the bulk ferment and final proof timing for your next bake, ensuring better results next time.
FAQs
How do you know if your sourdough is underproofed?
Your sourdough is underproofed if the poke test shows the dough springs back immediately with no indentation. It will feel dense, stiff, and lack airiness. During baking, the bread will have a tight, spongy crumb with big tunnels and a thick crust. In bulk fermentation, the dough won’t jiggle, looks smoothed out, and has few visible bubbles on the surface.
How to tell if sourdough is over or under fermented?
A well-fermented sourdough will have a light, airy, and even crumb, with a tall shape. Instagram shots of perfectly proofed loaves show this. However, both under-proofing and over-proofing can lead to dense, flat, and unattractive loafs, lacking the desired texture and shape.
Is underproofed sourdough dough sticky?
Underproofed sourdough dough can feel sticky, but it’s not always a reliable sign. Stickiness can also come from overproofing or high hydration levels. The main sign of underproofing is a dense, gummy crumb and a lack of elasticity, which makes the dough harder to handle and shape. A well-developed gluten structure helps with holding air and preventing stickiness.
Do big holes in sourdough mean underproofed?
Big holes in sourdough don’t always mean the dough is underproofed. They can also result from overproofing or high hydration levels. If the bread has big holes but feels dense and lacks the right crumb texture, it means the dough likely didn’t rise enough, indicating underproofing.