As a sourdough baker, one of the most common challenges is dealing with over-proofed dough. If you’ve been baking for a while, you’re probably already familiar with the ins and outs of the process, but even experienced bakers face this issue. Over-proofing happens when the dough has been allowed to rise for too long, causing it to lose its strength. This often results in a loaf that is dense, weak, or flat with a crumb that feels dry or even collapsed. In this stage, the dough starts to lose its texture and the bubble structure gets disrupted. The once promising loaf becomes stretchy and hard to shape.
What Does OverProofed Sourdough Bread Look Like? THE SHORT ANSWER
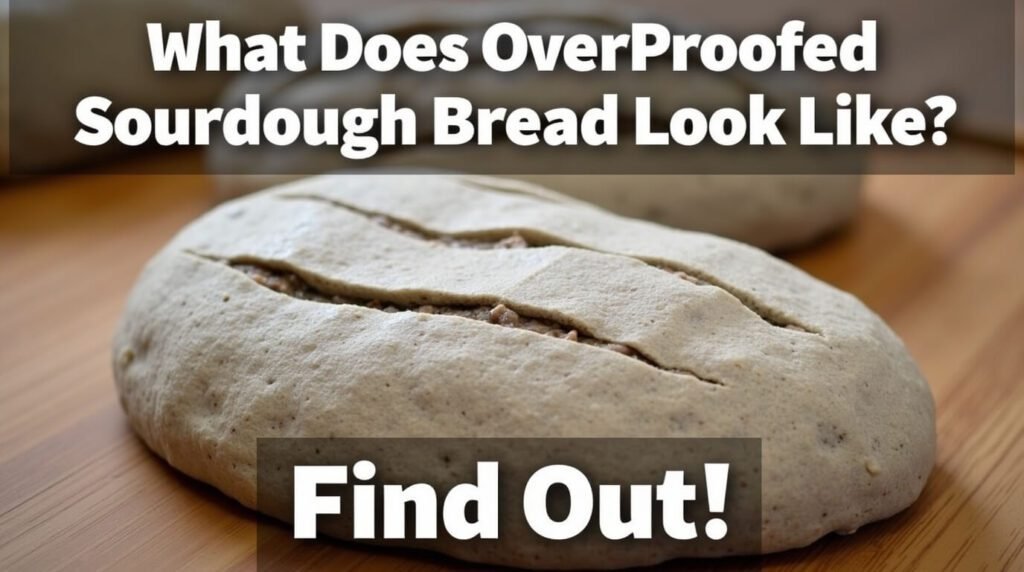
The best way to spot over-proofing is by examining the surface and texture of the dough. You’ll notice that the dough may be overly yeasty, and when it’s shaped, it won’t hold together well. It can sometimes even crack on the surface as the fermentation process has gone too far.
Understanding this can be frustrating for newbies, but it’s an inevitable part of the learning process. As you continue baking and exposure to the dance of ingredients, time, and technique, you’ll begin to discover the right balance, which will help you avoid over-fermentation. Luckily, this issue is easily fixed, and with some tricks, you can prevent it from ruining your perfect loaf!
The Secret to Perfect Sourdough: Proofing in the Fridge; CLICK HERE
What is Proofing?
Proofing is a crucial step in sourdough baking that involves allowing the dough to rest and ferment. This process has two key phases: bulk fermentation and final fermentation. During proofing, the dough develops its flavor, texture, and structure, playing a vital role in making the bread rise properly. Understanding how long to let the dough ferment and the signs of over-proofed dough helps you create the perfect loaf. By breaking the process down, you can discover the balance needed to avoid any mishaps, such as over-proofed loaves.
Bulk Fermentation
Bulk fermentation is the process where the dough undergoes its first rise after mixing the initial ingredients. During this stage, wild yeast and lactic acid bacteria begin to break down the sugars in the flour, producing carbon dioxide gas, which makes the dough expand and rise.
This slow process can last anywhere from several hours to an overnight proof, depending on the recipe and factors such as temperature and humidity. It’s during bulk fermentation that the dough starts to develop its structure and flavor, setting the stage for the final rise.
Final Fermentation
Final fermentation, also known as final proof, is the stage where the dough is shaped into its final form and left to rest and rise. This can be done at room temperature or in the refrigerator for a cold proof. During this phase, the dough undergoes a slower cold fermentation that allows the flavors to mature and intensify, while the activity of yeast and bacteria slows down due to the lower temperature. Depending on the recipe, this process can last from several hours to a few days, enhancing the bread’s texture and structure before being baked to perfection. It’s a crucial step to master if you want to achieve the ideal characteristics of sourdough bread.
What is Over-proofed sourdough?
Over-proofed sourdough occurs when the dough has been allowed to ferment for too long, beyond the ideal proofing time. While there’s some leeway with timing, once the dough has fermented past its peak, it starts to lose its spring, resulting in a sticky and wet dough that can’t hold its shape.
The bread also lacks the oven spring that creates those beautiful bubbles in the crumb. In contrast to under-proofed dough, which feels tougher and resists when poked, over-proofed dough won’t spring back at all. The resulting bread will have a dense, undesirable texture, showing clear signs that it’s been left too long in the proofing stage.
Underproofed Sourdough? Don’t Bake Before Reading! CLICK HERE
Causes of Over-proofing
Over-proofing in sourdough happens when certain factors like temperature, hydration, and starter activity aren’t properly managed. For example, a warm kitchen, especially in springtime or near the heat of summer, can accelerate fermentation, especially if the temperature reaches 85°F. Without air conditioning, this can lead to a faster fermentation and cause the dough to over-ferment.
Dough hydration is another key element; too much water in the dough can weaken its structure, making it more prone to over-proofing. I usually use a 70% hydration, but the right method depends on the flour variety, as different types, like whole wheat, absorb water differently. Additionally, a vigorous starter can cause rapid fermentation, while a weak starter may lead to underproofing. Getting the right starter activity, hydration level, and timing is crucial to avoid over-fermentation and ensure the bread has the right texture and bubbles in the crumb.
Signs of Over-proofed Sourdough
- The dough appears flattened, losing its natural shape and structure, spreading out into a flatter appearance that won’t hold well.
- It has a sticky texture, often due to the breakdown of gluten from over-fermentation.
- Blisters or bubbles on the surface indicate excessive fermentation gases.
- The dough won’t spring back when pressed, lacking elasticity. Use the poke test—if it doesn’t bounce back when gently pressed with your finger, it’s likely over-proofed.
- The bread may have a sour smell that is more intense than normal, often becoming unpleasant.
- A collapsed or sunken center can appear, especially if the dough was proofed for too long.
Solutions for Over-proofed Sourdough
- Reshape the dough gently to help restore some structure and redistribute the gases. This works if the dough is only slightly over-proofed. If it’s been too long, the shape might not recover, but you can still make a great focaccia out of it.
- Adjust the proofing time to prevent over-proofing. Keep an eye on the dough and stop the rise when it’s just right, before it goes too far.
- If your kitchen is too warm, move the dough to a cooler spot or adjust the proofing time to control the rise better.
- Use cooler water to slow down the fermentation process, especially if your dough tends to over-proof easily.
- Reassess your starter’s activity. If it’s too vigorous, try using a smaller amount to control the fermentation speed.
- Experiment with different flour types as each has different absorption rates. This helps in finding the right hydration level for the perfect proofing time.
- For more manageable proofing, try dividing the dough into smaller portions. This can help control the rise and prevent over-proofing.
- Use retardation (or cold proofing) by placing the dough in the refrigerator for part of the proofing time. This not only slows down fermentation but also enhances flavor development while controlling the rise.
How to use over-proofed bread (When it’s gone too far!)
When over-proofed sourdough happens and the bread doesn’t turn out quite right, don’t worry—you can still use it! If the dough is too far gone to become a proper loaf, try making pizza dough instead. Simply stretch the dough out on a pizza stone, add your favorite toppings, and start baking. Another great option is focaccia. Just spread the dough into a casserole dish, add a little olive oil, and use your fingers to create dimples in the dough, finishing it off with toppings like rosemary. You can also use the dough to make flatbread, which works just like the pizza crust.
If you prefer something more practical, try turning the over-proofed dough into bread crumbs. Bake the dough in any vessel you have and let it dehydrate. Once it’s completely dried, toss it into a food processor to make perfect bread crumbs. Another fun idea is making sourdough crackers! This is a great way to use up any over-proofed dough while still enjoying the sourdough flavor.
Signs that Your Sourdough Bread is Properly Proofed:
When your sourdough bread is adequately proofed, it should feel light and airy. The dough will have a nice, slightly puffy texture and will not collapse when you gently press on it. A fully proofed loaf will have a slightly domed top, with some visible air bubbles beneath the surface.
If the dough feels dense or doesn’t spring back, it may be under-proofed or over-proofed. When your bread has beautifully proofed, it will rise evenly, showing clear, telltale signs that the fermentation process has been just right. After baking, the bread will have an open crumb structure with a crispy crust and a light, airy texture inside.
Rounded shape
When sourdough is properly proofed, one of the first telltale signs is its rounded appearance. The loaf will have a domed top and a nice, even rise, giving it a shape that is round and tall. When you slice into it, you’ll notice rounded shoulders, a sign that the bread rose beautifully with a good oven spring.
This shape shows that the dough had enough strength to rise as it baked, unlike under-proofed bread, which often has a pyramid shape with a tall center and flat corners. In contrast, over-proofed sourdough will likely be flat, unable to rise properly during baking due to its weak structure.
No dense crumb
When you’ve allowed your sourdough to rise too long, the crumb will lose its typical texture. Rather than being light and open, the interior will look and feel heavier, and you’ll notice that it’s not as airy as it should be. This happens because the gas bubbles in the dough have expanded too much, causing the structure to weaken.
If you’ve added a sufficient amount of water to the dough, it should rise and cook evenly, but an overproofed loaf won’t hold up. Instead, you might find it dense, with a gummy texture and an overall underbaked flavor. The taste could also be off, a sign that the dough didn’t rise or cook properly. As a sourdough baker, it’s crucial to spot this in time to prevent any disappointment at the table!
Consistent holes throughout the crumb
When you slice into over-proofed sourdough, you’ll notice the crumb has consistent holes all the way through. Unlike a properly proofed loaf, where the holes are more evenly spaced, an over-proofed loaf tends to have small to medium holes scattered throughout the dough. These holes happen because the weight of the dough presses down on the air bubbles, causing the crumb structure to collapse and create these small pockets. It’s a sign that the dough has been left to rise for too long, which causes the gas bubbles to become too stretched, leading to an imbalance in the loaf’s overall texture. The bottom of the bread may also seem dense due to the air being squeezed out from the top during baking.
What Does Overproofed Sourdough Bread Look Like:
So what does overproofed sourdough bread look like? Here are some quick ways to identify pre-bake and post-bake.
Pre-Bake:
- When you look at your sourdough before baking, you may notice holes throughout the crumb. This is a sign of over-proofed dough. These holes can be small to medium in size and may be spread unevenly across the loaf.
- The dough might feel sticky or wet to the touch, which can happen if the moisture inside the dough hasn’t been absorbed properly. If it’s too runny and won’t hold its shape, it’s another clear indicator of over-proofing.
- As the dough sits, these holes become more pronounced as the structure weakens. The gas bubbles inside the dough are often over-extended, leading to these visible pockets.
- You may also notice that the dough doesn’t have the strength to hold a round or batard shape and may collapse when flipped from the proofing basket.
Post-Bake:
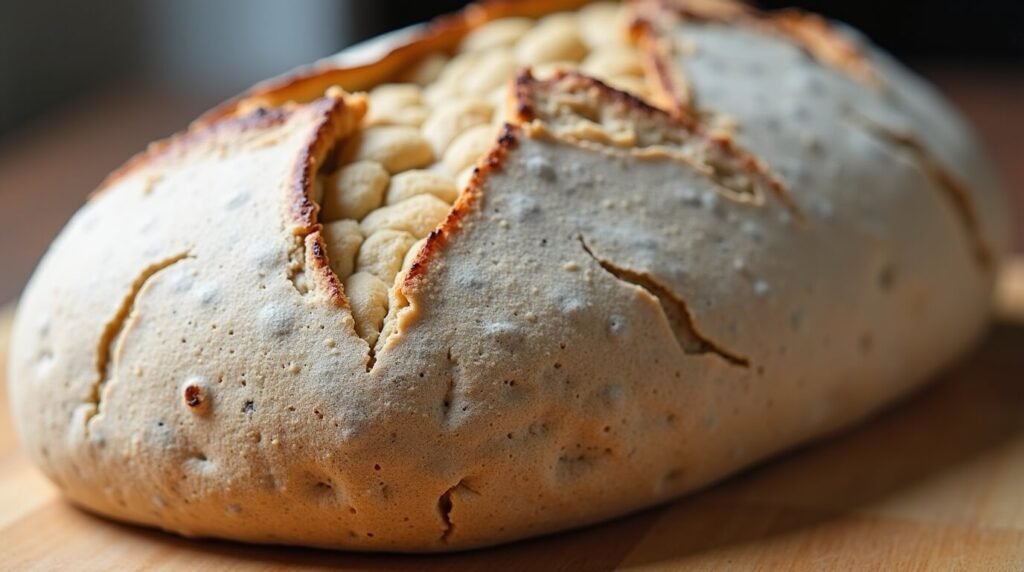
- After baking, over-proofed sourdough looks very different from a well-risen loaf. One of the first things you’ll notice is how flat it is, almost like a disc. This flatness happens because the dough, after too long a fermentation, becomes weak and can’t support a proper rise in the oven. The starter has already lost most of its energy, leaving behind a dough that lacks structure and strength.
- Another characteristic is that the color of the bread will be dull, often a lot paler than you might expect. This happens because the natural pigments in the flour break down during the prolonged fermentation, leaving the crust looking less vibrant and more washed out.
- When you cut into an over-proofed loaf, the crumb tends to be dense and gummy. The gases that should have been trapped inside the dough escape during baking, leading to an overly moist texture. Instead of the usual light and airy holes, you’ll find small, irregular pockets with raggedy edges. These holes may even look a little sponge-like, and the crumb can feel dense and heavy.
- The baked bread will also lack a distinct ear, that crispy, golden edge that many bakers strive for. This is due to the fact that the extended fermentation weakens the dough’s structure, preventing it from holding a crispy crust or ear during baking. The scoring slashes that are made on top of the loaf to help with expansion may spread more than desired, creating a wide and stretched look instead of a neat, controlled opening.
- Lastly, the bread’s texture and crumb may remind you of something that’s gone a bit wrong. The holes inside will be uneven, with a few large ones and some that are nearly closed off. The overall structure is compromised, and the final product lacks the typical rise, vibrancy, and crispness that a perfectly proofed loaf would have.
The Sourdough Baking Process
- When I first began baking sourdough, I quickly learned that everything starts with a starter — a living mixture of flour and water. It needs to be fed regularly and the excess is discarded as it grows. Through natural fermentation, the wild yeasts from the air begin to interact, making the starter mature and active. This becomes the leavening agent, much like commercial yeast, but with a more complex flavor and deeper aroma.
- Once my starter is bubbly and strong, I combine it with more flour, water, and a pinch of salt. This is where the structure development begins. I use gentle stretching and folding motions to build strength in the dough, ensuring it can hold the gases that form during fermentation.
- The next part is bulk fermentation, where the dough develops flavor and texture through the growth of bacteria and yeast. This is also known as the first rise, and I like to watch it slowly double in size. This stage teaches patience, as every minute adds complexity to the loaf’s taste.
- After that, the dough is shaped into the desired form and set aside to proof. This second or final fermentation can happen at ambient temperature or inside a cold refrigerator depending on the timing and my baking schedule. I’ve found that a slower, cooler proof adds a wonderful depth to the crust and crumb.
- Finally, when all the stages are complete, it’s time to score and start baking. The cuts help control how the loaf of bread expands in the oven, creating that signature artisan look that every baker hopes for.
FAQs
How Do you know if Sourdough is Overproofed?
You can tell if sourdough is overproofed by looking for a few signs. The dough will have lost its structure and when moved, it flattens easily. It will feel jiggly and sticky, a sign of excess fermentation. If you notice a sour or alcoholic smell, it’s likely overproofed. After baking, the loaf may be flat, dense, and have a gray or leathery texture, indicating it was left to proof for too long.
Is it okay to Eat Overproofed Sourdough Bread?
Overproofed sourdough becomes weaker, resulting in a flatter, denser loaf with a sourer flavor. If it’s only slightly overproofed, it’s still safe to consume, but excessively overproofed dough may not be salvageable. Instead of a traditional loaf, you can use it for focaccia or pizza.
What Does Overproofed Sourdough Dough Feel like?
When overproofed, the dough often has a sour smell, similar to a starter that’s ready to be fed, with a noticeable tang. The texture becomes sticky and stringy, making it difficult to handle or shape properly. It may also cling to the sides of your bowl more than usual, showing that the fermentation has gone too far.
Does Overproofed Sourdough Go Flat?
Yes, overproofed sourdough can go flat. If the dough has fermented for too long, it loses its ability to rise properly during baking. This often results in a loaf that’s flat, like a pancake. The dough can’t support the usual rise, leaving it dense and lacking the airy texture that we expect from well-proofed sourdough.